In this Website Training Module, we’ll discuss how to add a special section to one or more of your web pages that features a question-answer style of content, a Frequently Asked Questions section or FAQ, for short.
Though we’re specifically discussing FAQ content in this module, the same principles being used in the Detailed FAQ Method can be applied to other types of specialized content, like Knowledge Base or Support Document-style content.
In any case, there are many ways to add custom content, like an FAQ section, to your website. For training purposes, our scope will stick to the easiest methods; however, more advanced participants may be interested in exploring more programmatic methods that involve creating custom content types (which behave identically to WordPress “Page” and “Post” features) by adding some simple PHP code to your WordPress theme’s functions.php file. Additionally, you could opt for one of many WordPress plugins that create a custom content type and have a pre-built interface that makes serving specialized content even easier.
If you are considering using plugins to either add custom content types or extend some other functionality, please keep in mind that you will likely need to pay an annual subscription fee, and adding more plugins generally increases your need to play a more active role in regular site maintenance, as having more plugins increases the risk of cross-compatibility issues amongst all of your installed plugins and negatively impacts your site’s speed/performance. Once you start depending on multiple plugins, your need for dedicated/increased server resources will exponentially rise.
FAQ Methods
For training purposes, I have simplified the topic of FAQ content into two types: Simple and Advanced. To determine which choice is best for your use case, the first question to answer is how comfortable you are with putting together advanced layouts and hopping back and forth between tabs to put together a content system?” As its title implies, the Advanced FAQ method requires more patience and skill to deploy.
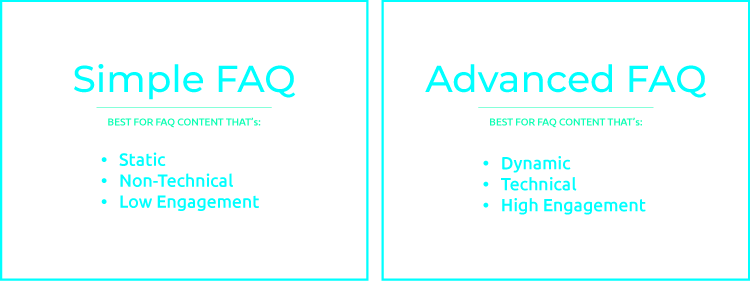
Another question to ask yourself is whether or not the information you’re intending to convey in your FAQ is of a technical nature. If you have a lot of technical information to convey in your FAQ, an Advanced FAQ method might be your best option, especially if you have a few standard levels of info, like a table or series of details, like sizes, colors, square footage, etc.
While there are surely exceptions to this line of reasoning, reserving Advanced FAQs for overtly technical details, one that comes to mind is a scenario in which you have non-technical/low-engagement information, but you have a numerous amount of questions/answers. In the case where you have a ton of FAQ content, simple or otherwise, you might consider an Advanced FAQ setup on your site.
Implementation/Development
Beyond the content differences between these two solutions, you’ll also notice a stark difference in how the FAQ methodologies vary in implementation. We’ll be discussing this in more detail further in the lesson, but here is a quick explanation of how we’ll be developing both simple and advanced FAQs:
- SIMPLE: Requires adding either a Text, Accordion, or Tab module to a section of your desired web page(s) and then filling it with your text
- ADVANCED: Relies on making individual posts for each FAQ, essentially making each FAQ free-standing and linkable content. To display the FAQ Section on the front end, we’ll be adding a Blog Module to the relevant web pages on your site and filtering only posts that are categorized as “FAQ.”
Simple FAQ Method
If you decide your website only needs a simple FAQ section, we'll be following a few easy steps. For your quick reference, here they are:
- Activate Divi Builder on a Web Page
- Choose/Add a Module
- Customize the Module
Step 1: Activate Divi Builder on a Web Page
First, you’ll need to choose which web page needs an FAQ section. If you know or anticipate the need to add an FAQ section to multiple pages, I recommend saving your FAQ section as a Global Element, thereby saving it to Divi Library for later use. Additionally, saving as Global Element means that anywhere you edit your FAQ section, whether in Divi Builder on any page you’ve added the section or through Divi Library, will automatically sync with the other linked FAQ sections and update them!
Here’s a quick recap on how to activate and use Page Builder:
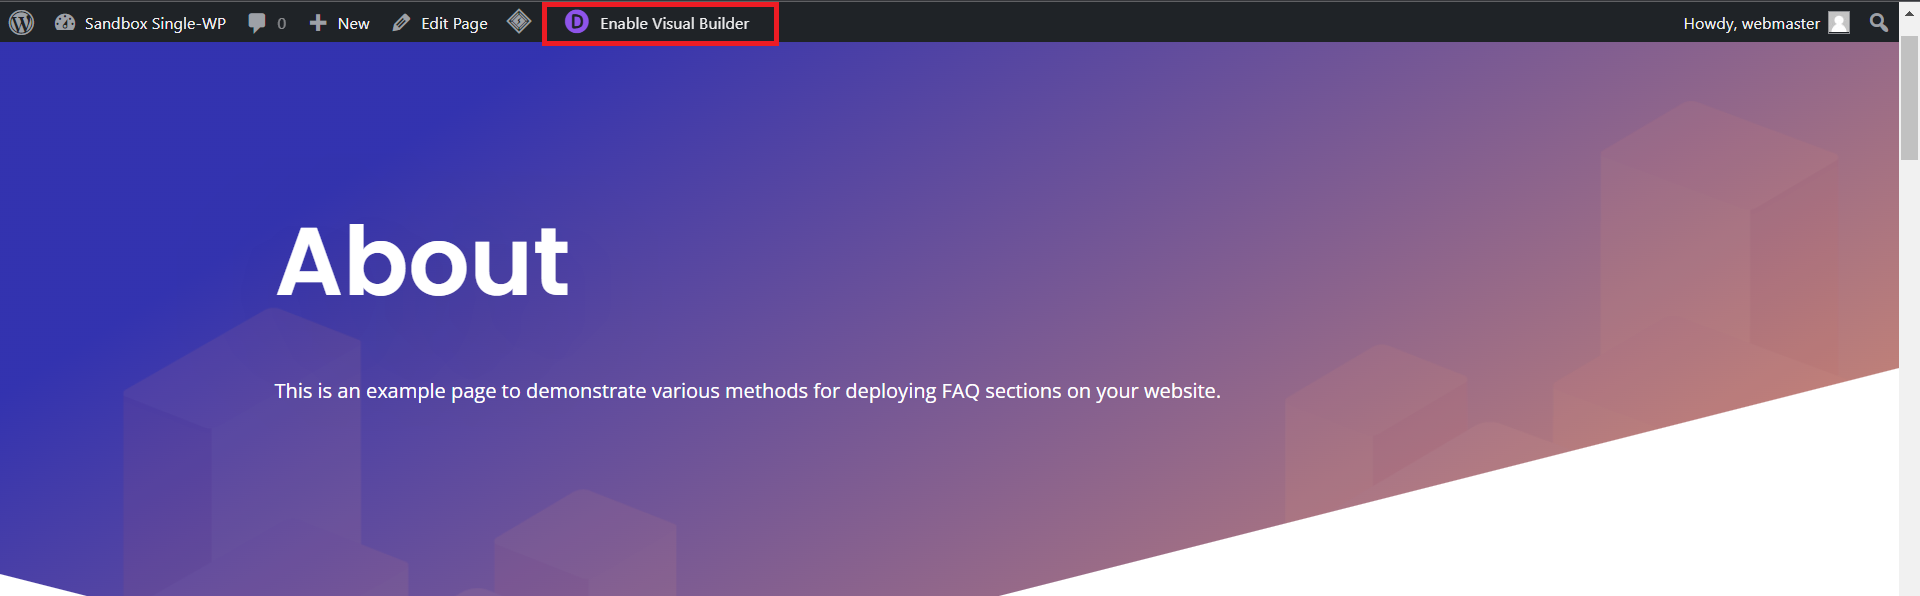
- Navigate to the Page: Once you’re logged in to your site, navigate to the web page that needs an FAQ section.
- Enable Visual Builder: Look to the top admin bar once the web page loads and click the Enable Visual Builder option that has a purple and white “D” icon beside it.
Step 2: Add a Module
Once you’ve activated the Visual Builder on the relevant web page, click the gray and white plus icon in the Row of your choice to begin placing the module you’ll use to display your FAQ.

Next, a popup will provide you with a list of various modules. Locate the one you decided to use for your FAQ section.
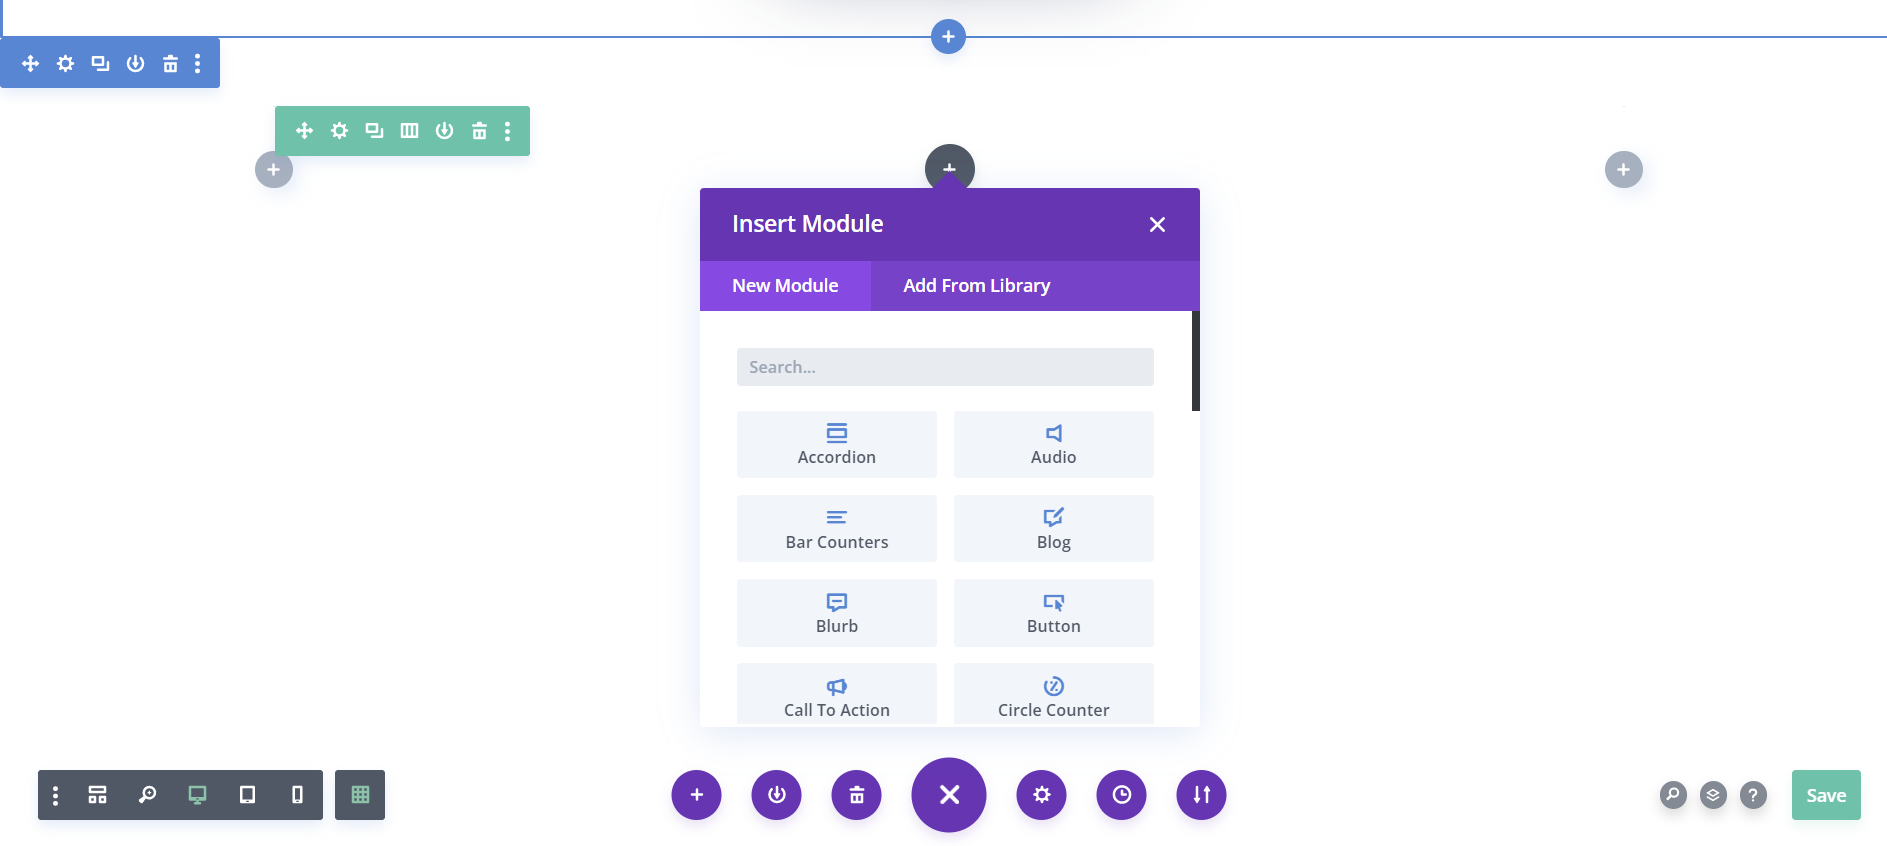
Choosing the Right Module
There are a variety of modules available in Divi Builder that can help you accomplish the goal of adding an FAQ section. The simplest option is to add a Text module and paste your FAQ text into the Body Text area, though this option poses UX concerns when you have a lot of FAQ content.
For those who value compact info that’s organized and not overwhelming, you might consider adding a Toggle, Accordion, or Tabs Module. All of these options give you, the page designer, the chance to minimize a user’s need for scrolling in navigating a page that contains an FAQ section, among other things.
Let’s briefly discuss the four modules offered by your website’s Visual Builder feature that I’d recommend for your Simple FAQ section:
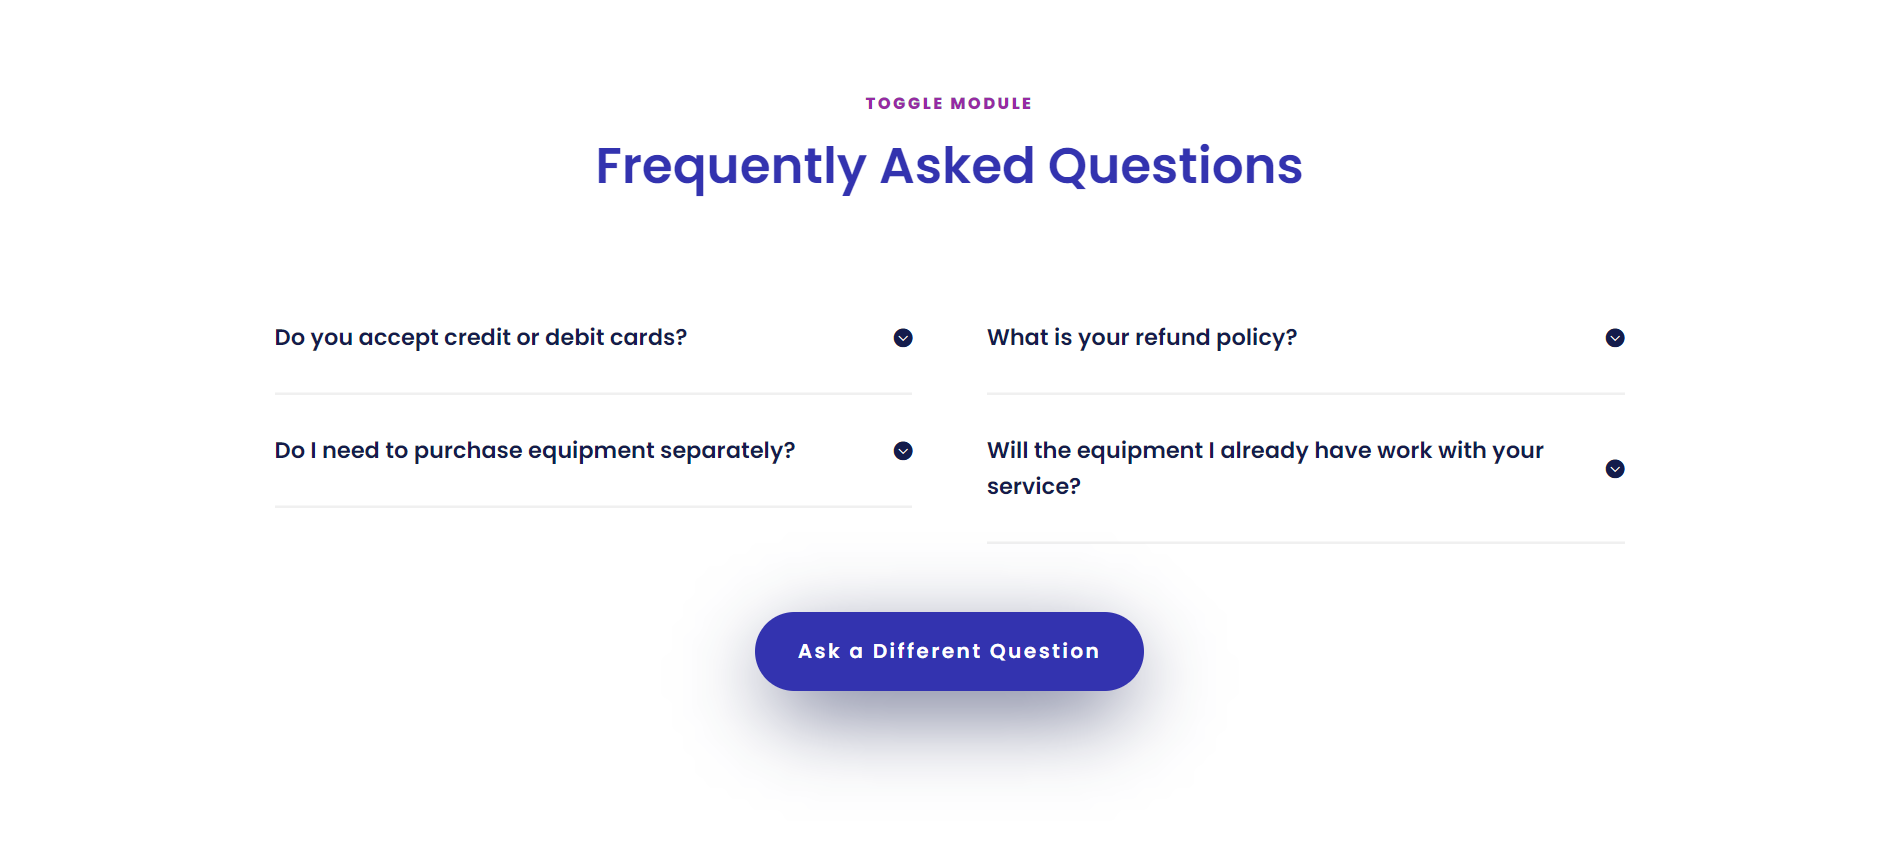
TOGGLE MODULE: Working nearly identically to the individual panels within the Accordion Module, the Toggle module is a highly recommended choice for FAQs, especially if you’re partial to the accordion style FAQ but you have a lot of FAQs. With multiple Toggle modules in place for your FAQs, you’re able to design a multicolumn row and distribute your toggles amongst the columns. A good use of a multi-column layout would be to designate each column for a particular subject (e.g., “Sales,” “Installation,” etc.).
ACCORDION MODULE: The Accordion Module consists of individual “panels” with titles that, upon clicking, expand to reveal body text relating to each panel.
TAB MODULE: Although the Tab Module results in a completely different FAQ visual interface, assembling it is much like the process described above for adding an Accordion module. Instead of “panels,” you have “tabs.”
TEXT MODULE: The Text module is a good choice if you have a few short FAQs to add to a section on a web page. Another good use case of the text module for displaying FAQs is when you’re creating a dedicated FAQ web page, in which case it would make sense to have all of the FAQ content laid out and scrollable.
Keep in mind, though, that if you have a lot of questions for your simple FAQ section, and this section is going on a page with other content, like a general About page, it’s probably not a good idea to use the Text module, because it will negatively affect the user experience of your web page.
Step 3: Customize the Module
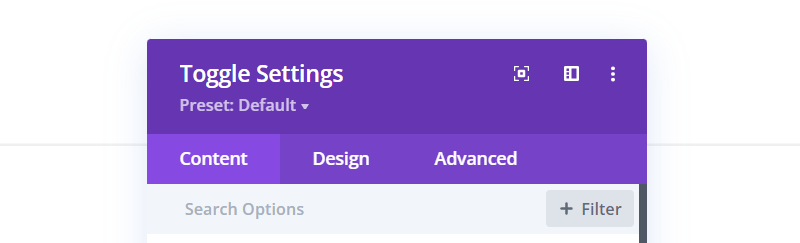
Module Settings Pop Up
When you add a module or modify an existing module’s settings, a pop modal will appear. The options will be divided into three tabs: Content, Design, and Advanced.
CONTENT: The Content section of the module settings is where you’ll add text, images, and other content for your module.
DESIGN: The Design section is where you will manipulate styling settings, like text sizes and color, as well as spacing and sizing details.
ADVANCED: The Advanced tab will lead you to a series of settings relating to coding, positioning, scroll effects, and more.
Content Settings
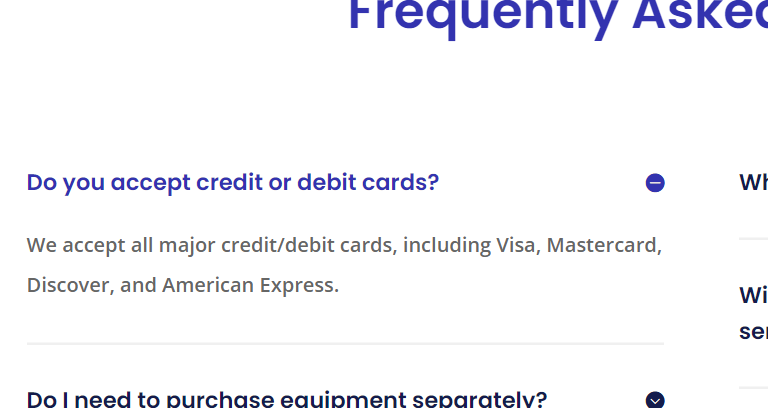
Toggle Module: When looking at the content settings for Toggle modules, you’ll notice the Title and Body area under the Text parameters. The Title is where you’ll enter the question, as it will be what appears in the panel of the Toggle. The title/question is the thing that people will click to open the toggle if they’re interested. So, make it interesting!
You’ll also have the option to select the state of the Toggle when the page loads. By default, the Toggle will be closed. Additionally, as with most/all modules, you’ll also notice options for Link, Background, and Admin Label. I don’t recommend using the link option here if you would like to link a particular FAQ to another web page instead, link the page in your Body text. Otherwise, users who click the Toggle to open will instead be whisked away to whatever page you enter into the Link options.
Tabs and Accordion Modules: In adding both the Tabs and Accordion Module, you’ll first notice a section to add or remove tabs (Tabs module) or panels (Accordion Module). In both cases, you'll see a gear icon, duplicate, trash, and options icons on each tab/panel placeholder. The gear icon opens the individual settings for each tab/panel, which also has its own set of settings tabs (Content, Design, and Advanced). It’s highly recommended to always use the Design settings of the module, as opposed to the Design settings for the individual tabs/panels within the module. Why? Modifying Design settings on the module level will cascade automatically to the child objects, in this case, the tabs or panels. Choosing this method not only speeds up your design time but also helps keep styling consistent. *chef’s kiss*
Design Settings
While there are many styling options to meticulously set, you’ll also want to experiment with font options and adding background colors to the panels and body, as well as stroke size/color choices for individual panels and the whole module.
A Note On Text Styling: Regardless of the module that you choose to present your simple FAQs (and any other written content, for that matter), I strongly recommend considering your text hierarchy or, more simply put, how you organize the text in your content. When writing any message of value, personal or otherwise, you can more clearly communicate when you use a combination of text styling methods to add a level of hierarchy that makes reading through the content easier on the eyes and more enjoyable for your end users.
- Add Labels: Adding either “Question” or “Q” and “Answer” or “A” before each bit of your FAQs helps make the direction of conversations more easily discernible for readers.
- Use Bulleted or Numbered Lists: using lists like this one helps organize text, and it establishes a break in the normal paragraph structure.
- Questions in Bold: By making the question text bolder than the answer text, it’s easier for one’s eyes to quickly navigate the section.
- Indents & Quotes: Consider using quote marks or even block quote formatting to clearly indicate the Question part of the FAQ. Additionally, the Answer part can be indented beneath the question.
Advanced FAQ Method
The most straightforward way to do this is to utilize the Posts feature in WordPress, the same way you go about adding blog posts to your website. In choosing the following configurations, the only difference between creating an everyday blog post and a FAQ post will be that you’ll use a specific category, such as “FAQ.” on the blog posts you intend to use in your FAQ section.
If you’re still with me, at this point, let’s go through the Advanced FAQ Method, step-by-step:
- Create a new Category for Posts
- Create your FAQ blog posts
- Add a Blog Module
Step 1: Create a New Category for FAQ Posts
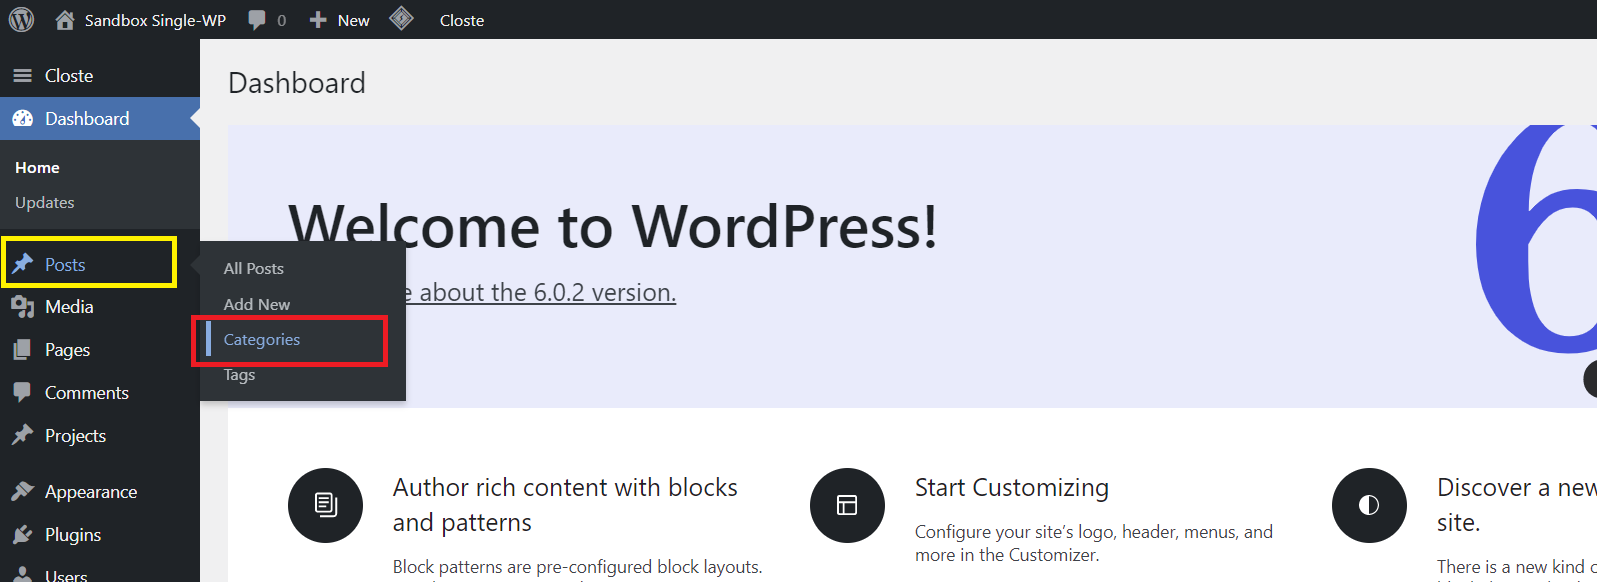
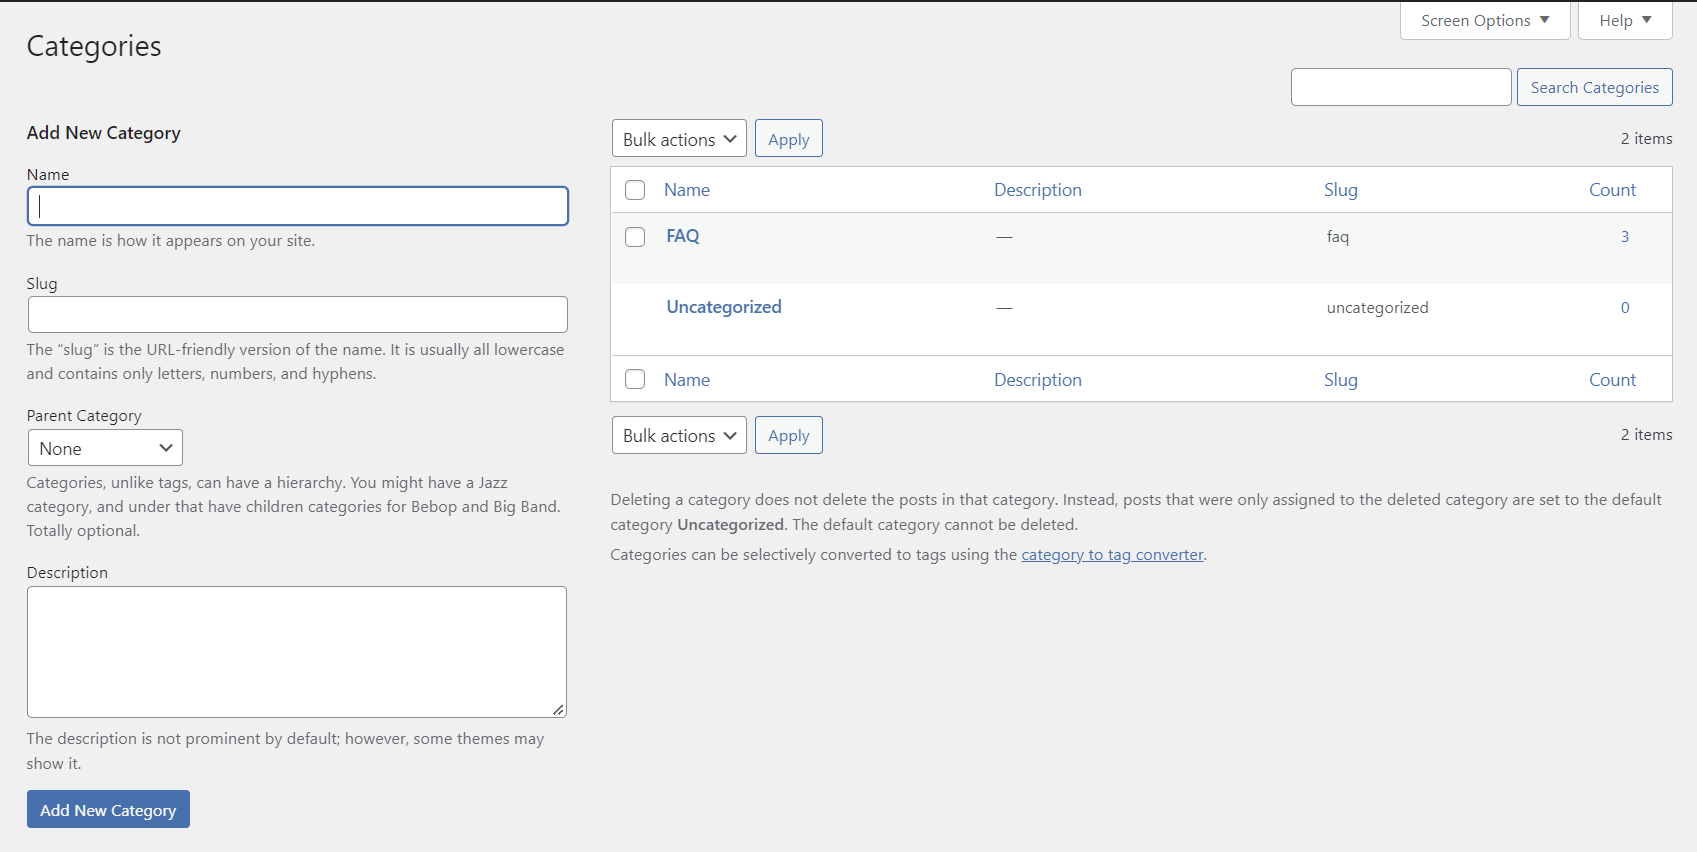
Navigate to Categories: The key to making this method work is first creating the “FAQ” Post category. To do this, navigate to the backend of your WordPress website and click the Posts submenu to expand it. From there, select “Categories.”
Add New Category: The left side of the screen has an Add New Category column. Simply add “FAQ” to the name field, and the “Slug” field will automatically be filled with “faq,” leave that field as it is. In the Parent category field, you can leave it set as “None” or select one of the categories already added to your site to be the “parent” or “containing” category. You can also add a description if you’d like. Once you’re done, click the Add New Category button and wait for the page to reload to confirm the new category has been created.
Step 2: Create your FAQ blog posts
New Post: Create a new blog post (refer back to the Creating a Blog Post article for a refresher on how to do so)
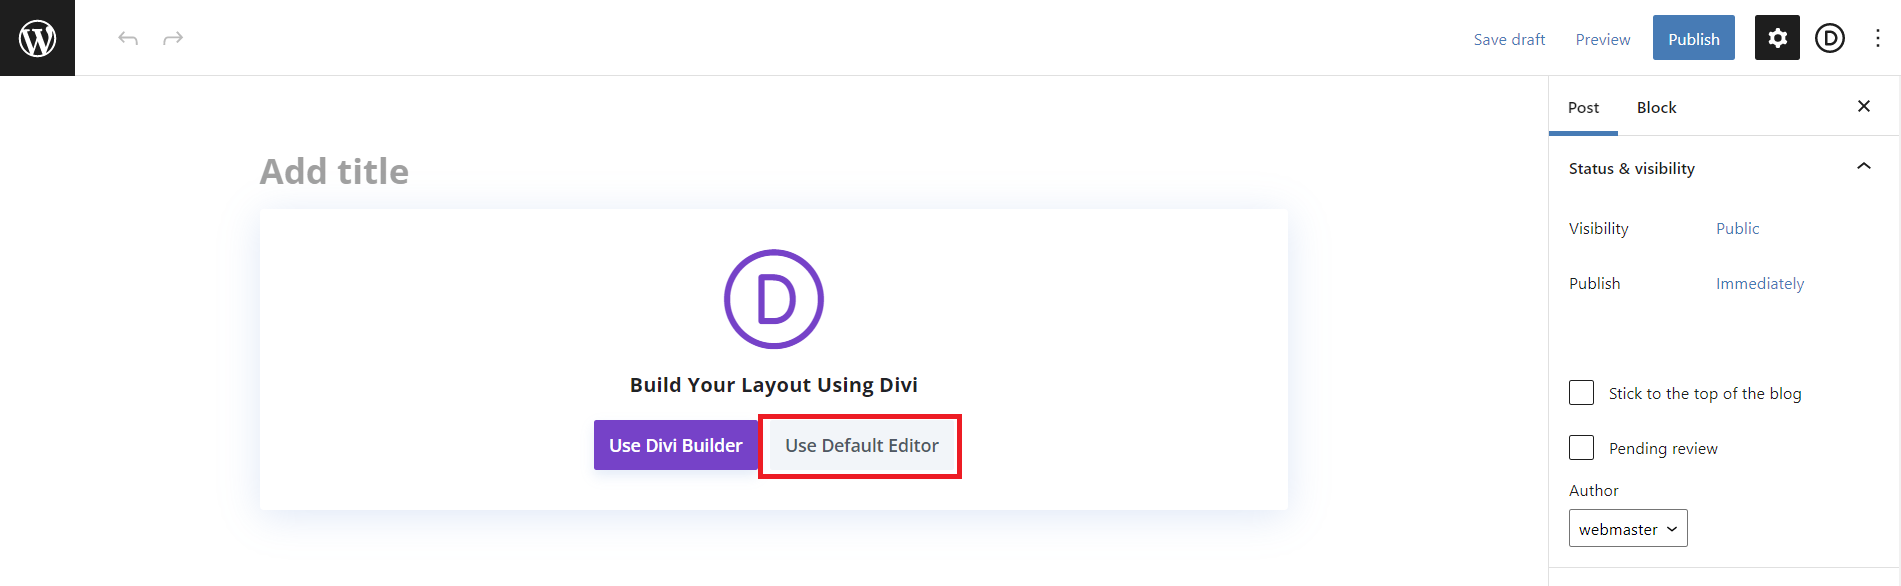
Enter Content: In the content area, you will have the option to use Divi Visual Builder or to use the standard method for content entry. Let’s use the standard method. Paste in your text and take a moment to format it if it isn’t already.
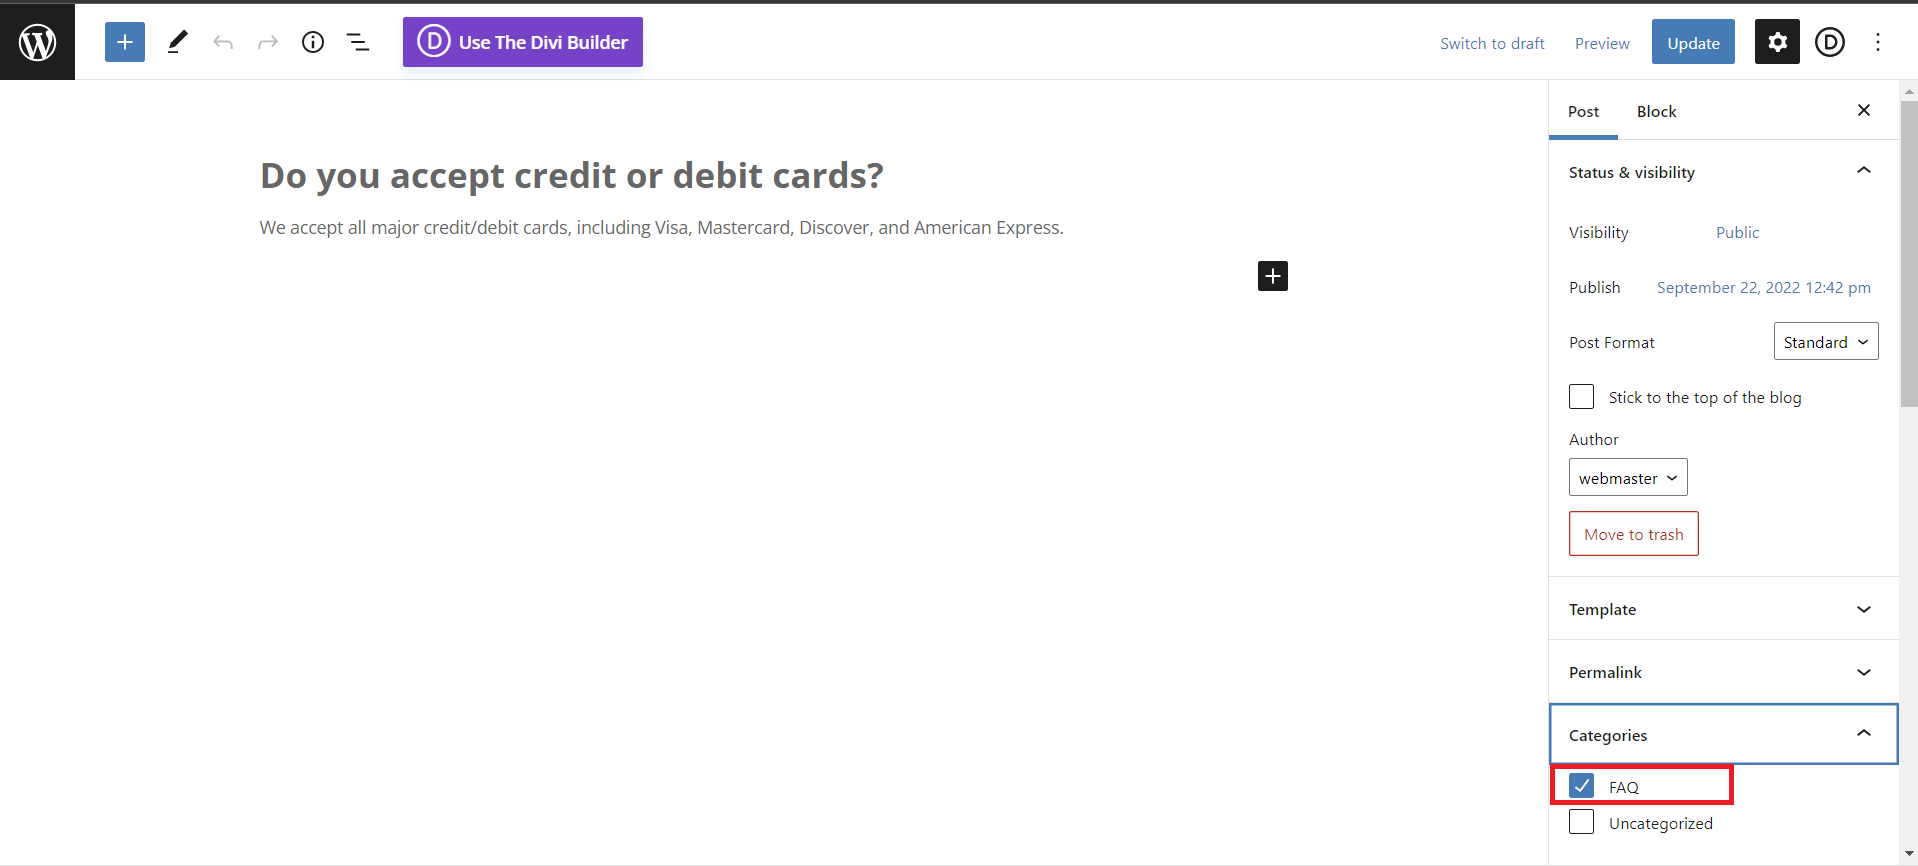
Set Category: Be sure to set the category to our newly added “FAQ” option. Also, consider adding other types of categories to better organize your FAQ blog posts.
Publish/Save: If your FAQ post is ready, click the Publish button near the top right of your screen. Since this will be the first time your new post is being published, WordPress will prompt you to double-check your settings and confirm that you want to publish the post.
Alternatively, you can also save it as a draft, though for demonstration/referencing purposes, it might be difficult to ascertain what the end product for your FAQ section will look like until your content is published. If you’re not using a sandbox site and instead are adding directly to your live/published website, you might find the option of creating an unpublished page to use to style your FAQ section in a non-public-facing way preferable.
Step 3: Add a Blog Module
The last step is to add a Blog Module to each page needing the FAQ section. As always, if you’re adding your FAQ to multiple pages, I implore you to consider creating your section as a Global Element, as mentioned above.
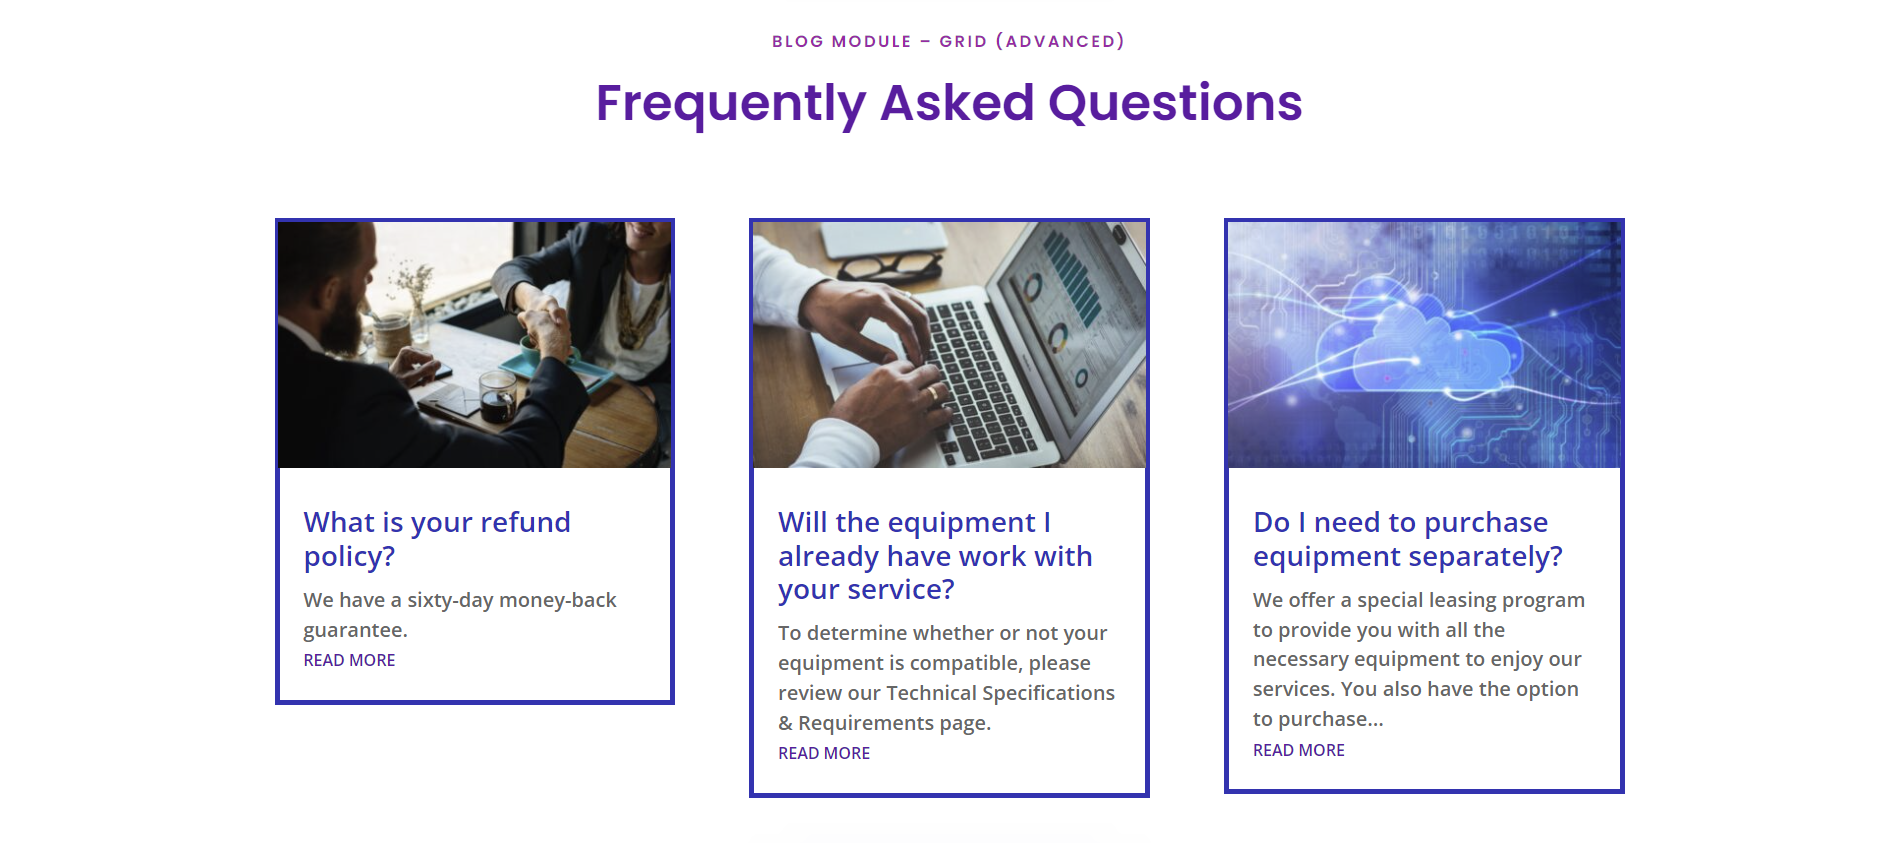
What is a Blog Module? It’s a module that, based on the parameters you define in its settings, searches for blog content you’ve published and displays blog previews as a grid of previews that automatically link to corresponding posts. In this case, we’re going to add a Blog that specifically searches and serves up blog posts categorized as FAQs (I think now you’re probably beginning to understand the power of categories in WordPress!).
Add Blog Module: Once you know where you want to place your FAQs, click the gray and white plus icon in the Row of your choice and select the Blog Module. The default settings will be applied to the blog module once you select it. Don't fret, we'll customize it. Usually, the default layout for Blog modules is the "Fullwidth" option, which includes a featured image at the full width of your column/Row. The alternate option, which we'll talk about a few lines down from here, is the "Grid" option.
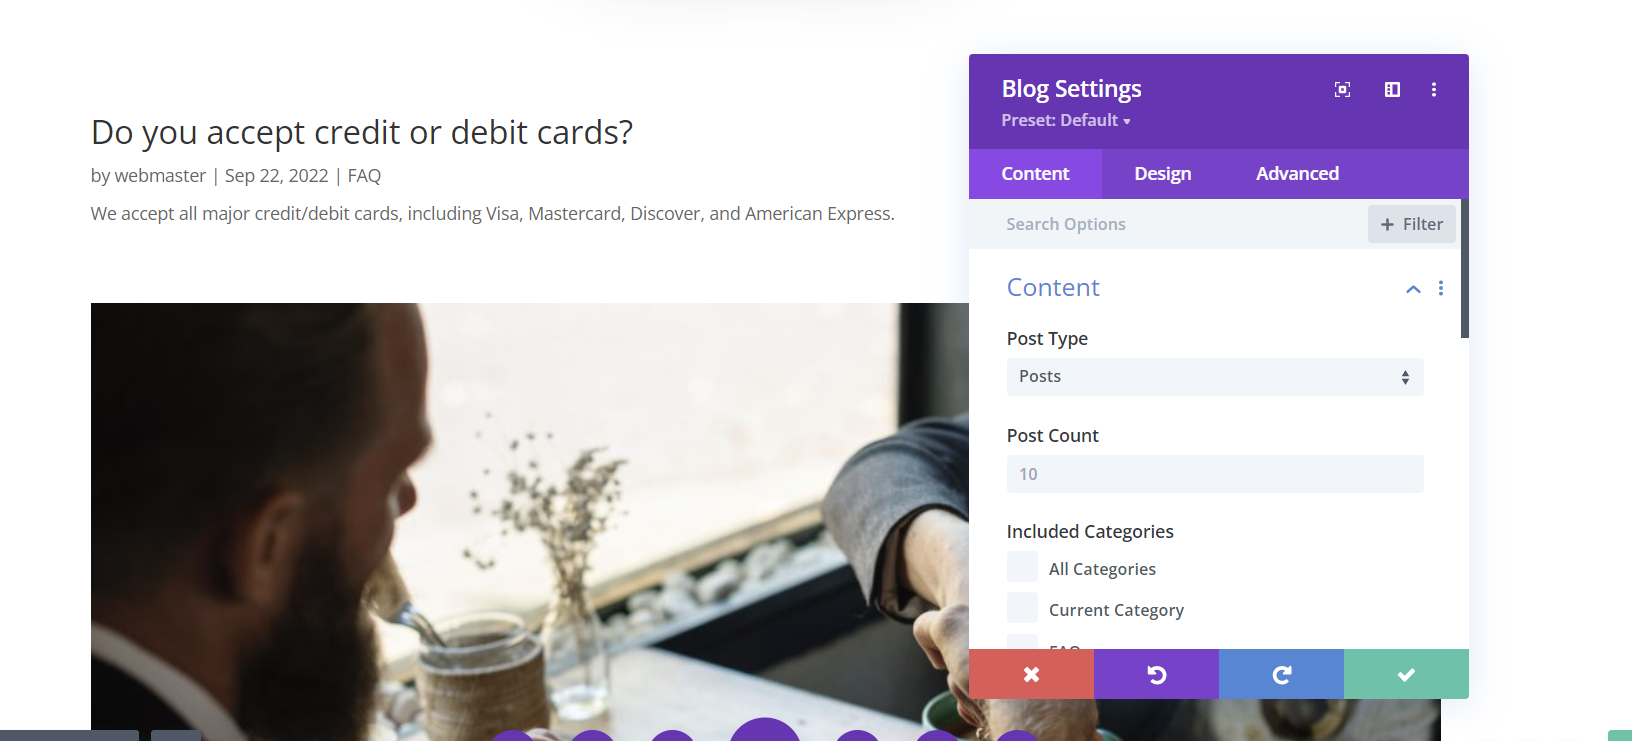
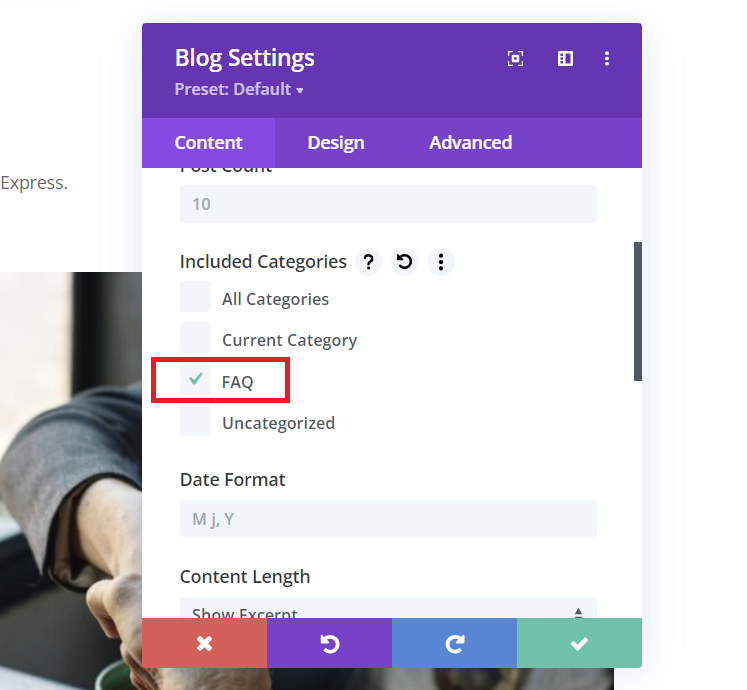
Set Content Settings: The post type we're targeting is the option "Posts." Included Categories must be set to our new FAQ category.
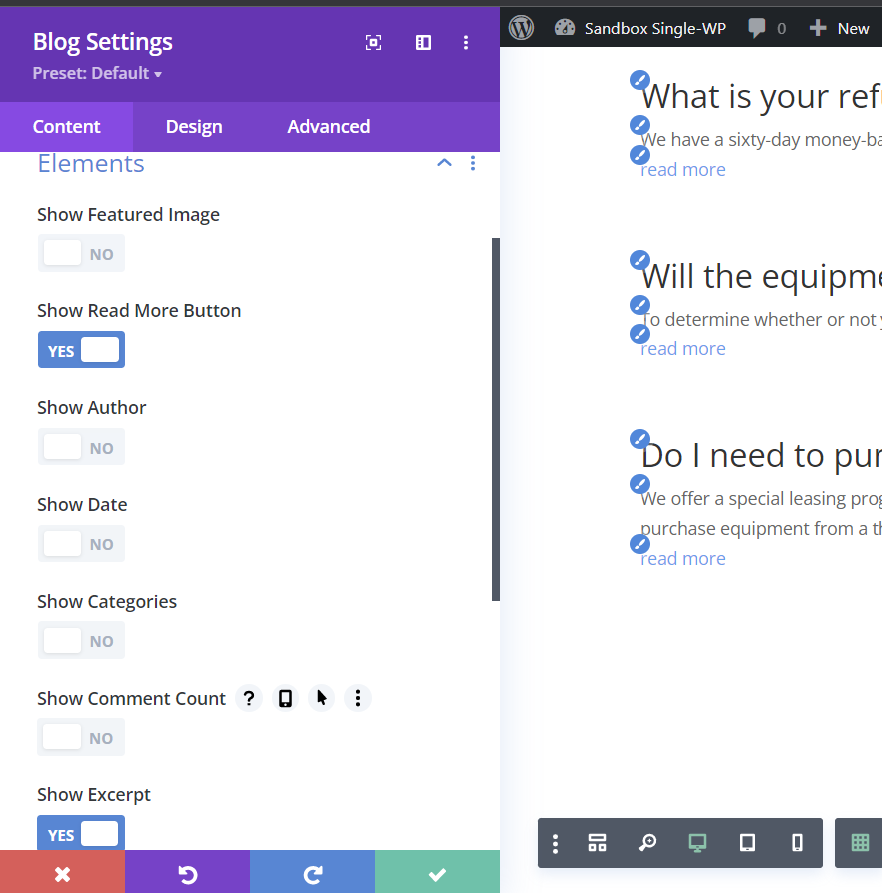
Choose Elements: The first option you’ll see in the settings is “Add New Post Element.” Here you are able to add the info from your FAQ that you want to appear in the preview, such as the Title/Questions and the date it was posted. Each element will have dedicated design settings, so you can vary stylistic choices like fonts and sizes between elements. After editing each element and clicking the green check mark button, you will be taken back to the overall Blog Settings.
The most straightforward settings for Elements are shown below; in most cases, you won't need/want to show the Featured Image, Author, Date, or Categories.
Design Settings: One of the last things you’ll want to consider when adding a Blog is how that Blog will look to your end users. You should plan on spending a little bit of time experimenting with the design settings, where you’ll be able to change the alignment of the Blog, Layout, and spacing options amongst individual elements and other modules neighboring your Blog.
Conclusion
Once you take a moment to evaluate your content needs and weigh that against your skill/comfort level with basic web development, you should be able to quickly determine which FAQ method will work best for your Divi theme-powered website. Whether or not you choose the best method now doesn’t matter too much because you can always improve upon it later. The key consideration is that you’re taking time to develop useful content that helps close sales and reduce time in your tech support queue.
IS THERE A BETTER WAY? As mentioned previously, you can also create a custom content type as an alternative to using blog posts categorized as FAQs. This alternate solution is preferable to those that would like to keep these content types completely separate. While I personally recommend employing a custom content type and custom fields to streamline your content on both the front and back end of your website, the required level of experience and perspective required when preparing an expert-level FAQ integration makes it prohibitive to discuss in the context of this training. The main thing to consider is whether or not your FAQ is performing its function, regardless of whether or not it's simple, advanced, or expert level. If you find yourself with extra time and the right comfort and skill level with web design, you can always improve on your simple FAQ section in the future!