*Please note: every host is different. These are generalized instructions on accessing and changing advanced information on your server. These instructions may not apply if your server setup varies outside of the norm. If you do not feel comfortable, please provide us with full access to your server or select a hosting package with us. You can still use other services, such as a separate email host, on our hosting packages. We just need the DNS records to add third-party services.*
If you're using your own hosting for a site that we're building, we will need a few things from you:
- Access to your host as a whole - this is the easiest method for us to work on your site. This will give us access to everything from your file system to your domain record information. We don't keep passwords on hand after we're finished with a project, but you're always welcome (and it's recommended anyway) to change your password after we're done with the website and it's live on your domain. If this is your preferred method, send us your password information. If you don't want to provide us with your host login information and you feel comfortable navigating cPanel, granting FTP Access, creating MySQL databases, and changing domain records, keep reading. *Keep in mind that if you're hosting your current site on Squarespace, Weebly, Wix, or something similar, you will need to either have us host your website or find a host with access to the following information. We recommend paying for our hosting, but if not, we recommend InMotion Hosting, HostGator, or Bluehost.*
- WORDPRESS REQUIREMENTS - Before you decide on a host, you need to make sure your host can meet these requirements for us to install WordPress:
- -PHP 7.4 or greater, however, we encourage you to install PHP 8.0 or higher.
- -PHP Memory Limits Set To Max - no less than 120 seconds, but 300 or higher preferred.
- -MySQL 5.7 or greater OR MariaDB 10.3 or greater
- -Nginx or Apache with mod_rewrite module
- -HTTPS support
- -A full domain: For example, mydomain.com. If you're using a site that provides a free domain, we cannot use that domain. (E.G. https://myfreesite.wix.com)
- FTP/SFTP Access - this is usually something like an IP address or a URL that doesn't have HTTP: or HTTPS: at the beginning. We will need the host, the username, the password, and the port information to access your server securely.
- MySQL database or equivalent - Installing WordPress requires a dedicated database to store all of the website data in one place, so you will need to create a database, and provide us with the login information for the said database after creating.
- Create a subdomain and point it to a folder in your system - this is only important if you have an existing website that you would like to keep live during the development process of your new website. We recommend creating a subdomain like new.mydomain.com, and then creating a file in the root folder of your server. The root is often called root, public_html, or it's just something like "/". We recommend making a folder called "New Website". If you don't have an existing site or if you don't care for your main site to stay active, you don't need this step.
So where do you start? Let's go over some of the basic instructions.
cPanel
What is cPanel? cPanel is considered the hosting management platform of choice amongst amateur and professional developers alike and is regarded as an industry standard. cPanel is typically available on nearly every major web hosting provider's server offerings. If you're using a shared host such as HostGator, GoDaddy (which we do not recommend as a host), InMotion, or Bluehost, you're likely to have cPanel installed upon creating an account and server. Before we can tell you how to access FTP, you need to have a basic understanding of how cPanel works.
We are using examples from the HostGator website. We are not familiar with HostGator, however, they are one of the top-rated shared hosts. Your dashboard layout will vary depending on your host. Please check your host's knowledge base for exact instructions.
Logging into cPanel
Most hosts make this simple. Login to your account on your host's website. They should have provided you with a link in an email at the time of signing up. If you do not know how to login to your host's website, please contact their customer service desk.
Once logged in, you will be directed to your customer dashboard. You should see something similar to this example image provided by HostGator.
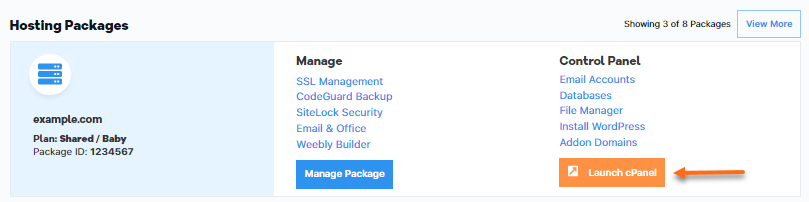
Once you find the cPanel or Launch cPanel option, click that and you should be automatically logged into cPanel. If not, please check the knowledge base of your host's support website to see if there are additional steps.
The cPanel Dashboard
Once you've logged into cPanel, you are automatically directed to the dashboard. It can be a little overwhelming due to the sheer amount of icons you're faced with upon launch. We're going to go over some of the sections and what they're for here. Just as a reminder, these examples are based on HostGator hosting and the icons you have access to may vary. Contact your host with any questions or concerns.
You may notice each section has a header with a title and some icons underneath. These titles and icons help quickly sort your control panel's necessary features, which all web servers have.
Look through the sections and check out the icons contained within. Remember, it’s unnecessary to know or memorize every icon. We recommend getting familiar with the sections and understanding why those icons were grouped into that section.
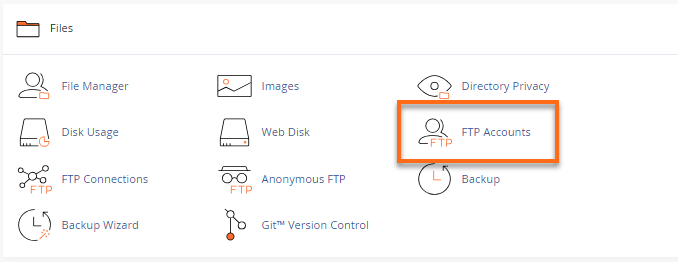
Files - This popular area will allow you to access all your files, including webpage files, images, FTP accounts, and the data associated with those.
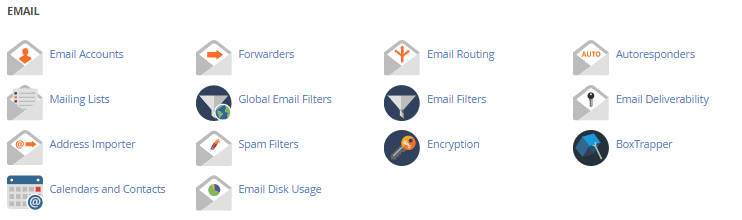
Email - Here, you can add new addresses, manage email, and other things like contacts, security, and email filters. If your email is hosted by a third-party service such as Google or Microsoft, disregard this section. Email is handled differently through each host if hosted directly on your server, so be sure to check with your host before making any changes here.
Databases - This is where you can manage your database content, features, and users. Think of Databases as large spreadsheets that are tracking information for your website. *DO NOT MAKE CHANGES TO YOUR DATABASE WITHOUT AN ADVANCED UNDERSTANDING OF SERVER DATABASE TABLES. THIS CAN BREAK YOUR WEBSITE OR ANY OTHER SERVICES HOSTED IN YOUR DATABASE. WE HAVE A SECTION EXPLAINING HOW TO CREATE A DATABASE LATER IN THE DOCUMENT.*

Domains - This more common area is where you go to manage domains, sub-domains, and DNS. Some hosts require DNS to be handled outside of cPanel, so be sure to check your host requirements before making any changes here.

Metrics - This is where you can review the performance numbers associated with your site and server, such as bandwidth, errors, and visitors statistics.

Security - This area will help you to monitor and manage the more sensitive areas of your site.

Software - For more advanced users, or developers, this area will help provide more in-depth tools regarding PHP, Ruby, and Perl. If you are unfamiliar with these, no worries, you won’t need these items to get started.

Advanced - Just like software, this section is for more advanced users or developers but still Advanced features of your server, such as Cron jobs, Apache Handlers, and more error pages.

Preferences - Here, you can edit the look, feel, and specifics of your cPanel dashboard to better suit your needs.

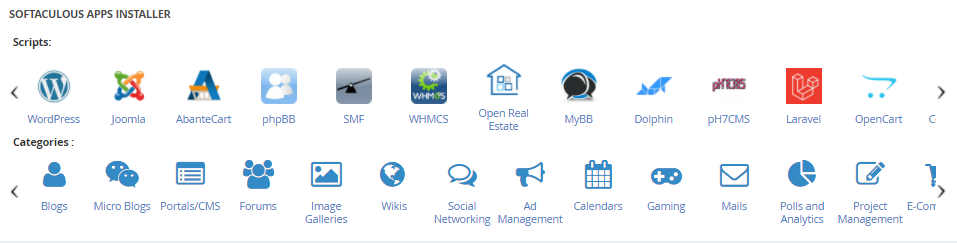
Softaculous Installer- This area lists the scripts like WordPress, Joomla, Magento, etc., which you can use for website development.
You may also see (at the left-side of your cPanel) the following data sections:
Statics- Sometimes separated, the statistical data will provide the overall # of features you are utilizing and the data. For example, here, you will see the number of the email address you have created, the number of Databases and the total amount of usage they contain, and the number of domains/ subdomains you have added to the cPanel, and more.
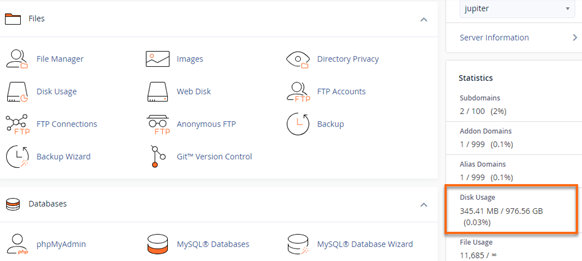
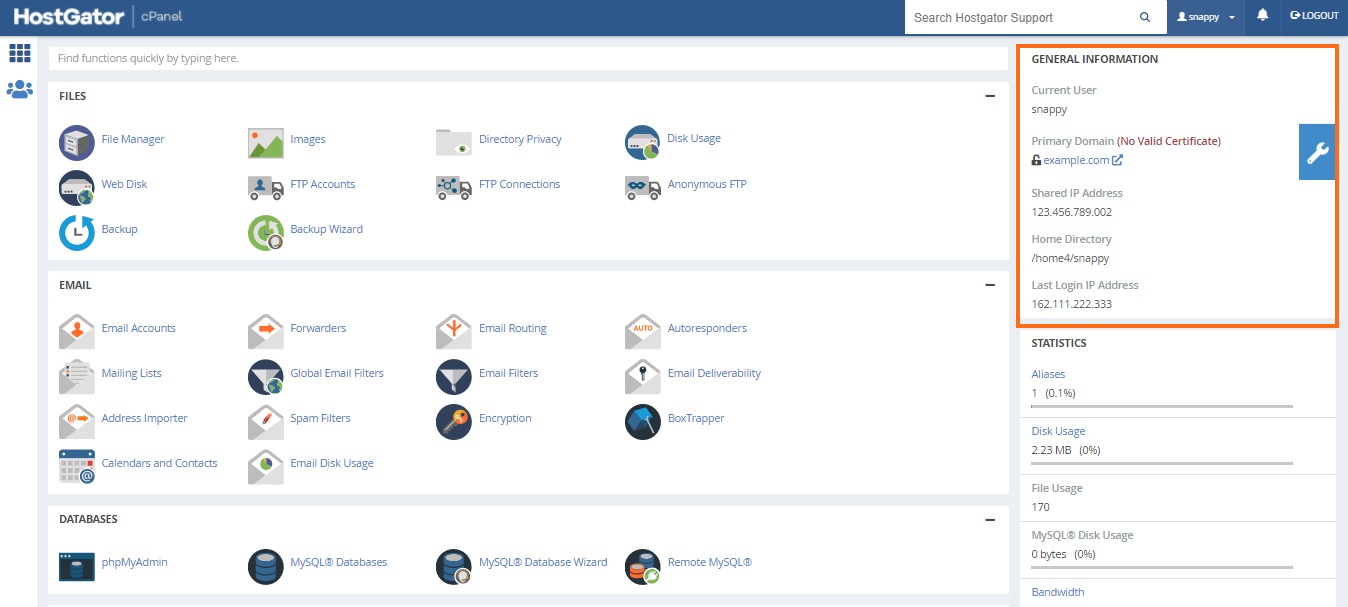
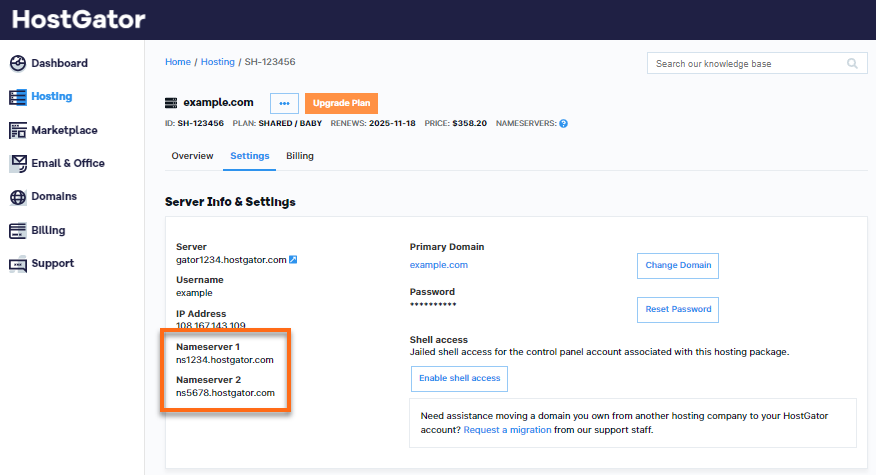
General Information - Will provide the unique information needed to identify and link to your server, such as your current user name, IP address, nameservers, and so much more.
FTP/SFTP via cPanel
An FTP account is used for uploading and managing files on your website. It is automatically created in cPanel when you sign up for hosting, create a cPanel, create an addon domain or subdomain, or enable anonymous FTP. So, by default, you already have an FTP account in your cPanel. Use your cPanel username and password to log in to it.
You can create new FTP accounts to give access to other users without giving them your cPanel and billing login credentials. For each additional FTP account created, you can also give each user different levels of access by assigning the user to a specific directory only.
As a reminder, these instructions are based on HostGator and will vary based on your host. FTP may be handled outside of cPanel, and you should check the support documents from your host for exact instructions.
Creating An FTP Account
To create an FTP account:
- Log in to cPanel
- Look into the Files section, then click on FTP Accounts.
- Enter the necessary information in the required fields.
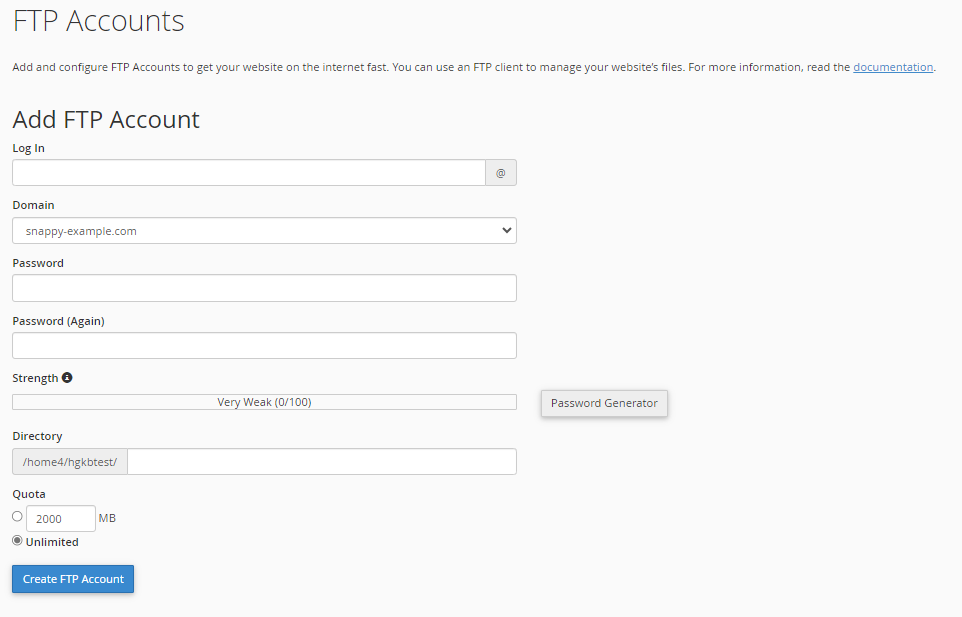
- In the Log in field, type the name of the FTP user. A full FTP user name will always be formatted as [email protected].
- Choose the domain where you wish to create the FTP account by selecting it from the Domain dropdown menu. You cannot create an FTP account without your domain name in it, regardless of the publish destination.
-
In the Password fields, enter a password that will be used to authenticate this FTP account. Be sure to save the username and password to give to your user.
-
In the Directory field, cPanel will auto-populate an assumed directory based on the FTP username, but that is normally incorrect. So, we recommend providing the directory you would like the user to access.
If you erase everything and type a single "/", the user will have access to your home directory (anything outside of the public_html folder).
Note: In this step, you can determine the level of access for a user. The FTP user will not be able to navigate outside of the specified directory; however, they will be able to access all files and subfolders inside that folder. - Set a Quota for the FTP account. The quota is the maximum amount of bandwidth the FTP user may use. Starry Eyes requests the quota be left unlimited for web development purposes.
-
Click Create FTP Account.
- Send the user you created their account information, including the host, username, password, and port number if applicable.
MySQL Databases
MySQL databases hold all the data from your WordPress site. In order for our team to create a WordPress install on your server, we will need a database created for the website, and user account with full privileges. Here are some instructions in cPanel.
Just as a reminder, these examples are based on HostGator hosting and the icons you have access to may vary. Your host may not use cPanel. Contact your host with any questions or concerns.
How To Create a MySQL Database in cPanel
- Log in to cPanel.
- Look for the Databases section, then click MySQL Databases.
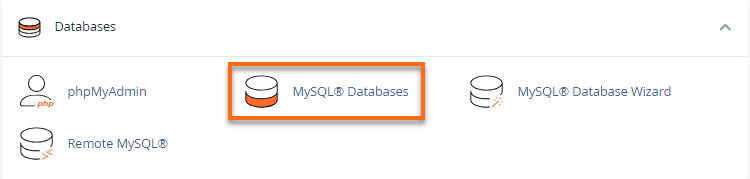
- In the New Database field, type a name for your database.
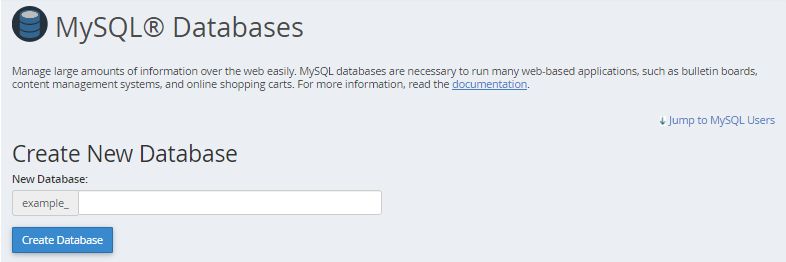
- Click Create Database.
- Click Go Back.
- The new database will appear in the Current Databases section.
Create a Database User
The MySQL user is a record in the MySQL server created for authentication purposes. This is different from your usernames when logging into Windows or even in your cPanel/WHM. Setting up a MySQL user provides more security to your website's databases as you can assign permissions to each user. Aside from you, the website's owner, you do not wish to grant just any user all access to your database.
After creating the database, you will need to create a user and assign privileges. Please note that MySQL user accounts must be created separately from mail and web administrator accounts.
How to create a database user
- Log in to cPanel.
- Look for the Databases section, then click MySQL Databases.
- Click the Jump to MySQL Users link at the top-right corner of the page. You may also scroll a little bit down to the MySQL User section.
- Under Add New User, enter a username.
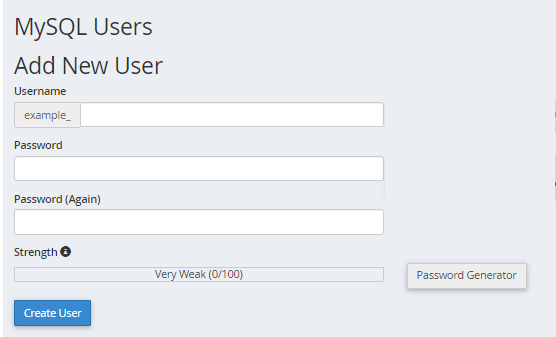
- Enter a password in the Password field.
- For help generating a strong password, click the Generate Password button.
- Once the password is confirmed, click on the Create User button.
How to assign privileges to a database user
- Log in to cPanel.
- Look for the Databases section, then click MySQL Databases.
- Under Add User to Database, select a user from the User dropdown menu.
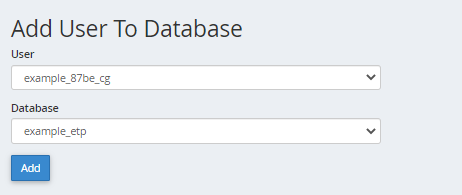
- From the Database dropdown menu, select the database you wish to allow the user access to.
- Click Add.
- Select the privileges you wish to grant the user or select ALL PRIVILEGES on the next page.
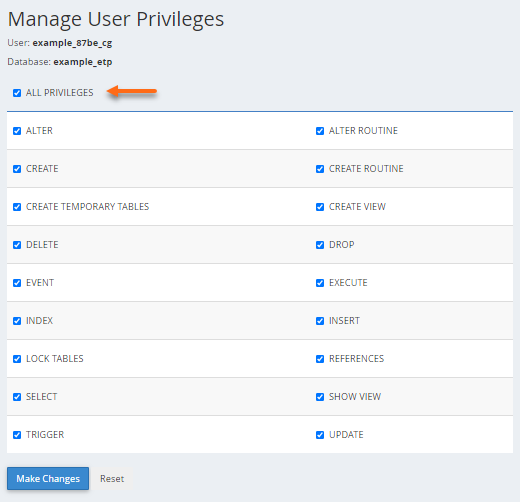
- Click Make Changes, then click Go Back.
DNS Records
With cPanel, users are granted access to make some DNS changes from within the control panel. Your host may not handle DNS records within cPanel, so be sure to check their support documentation for exact instructions.
Just as a reminder, these examples are based on HostGator hosting. It will vary with your host. Contact your host with any questions or concerns.
The following information will assist you in understanding the purpose of each DNS zone.
Name Servers
The name servers assist in finding the server and correct DNS zone for a domain to get the information on the other DNS zone records. Name servers translate domain names into IP addresses and tell the internet where to look for a domain's IP address.
If a domain was purchased from HostGator and we're your current registrar, you can update your name server within your Customer Portal.
What does it look like?
To know more about your name servers, please visit the article, What Are My Name Servers?
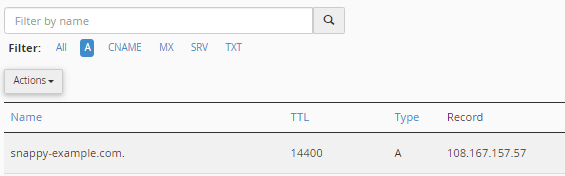
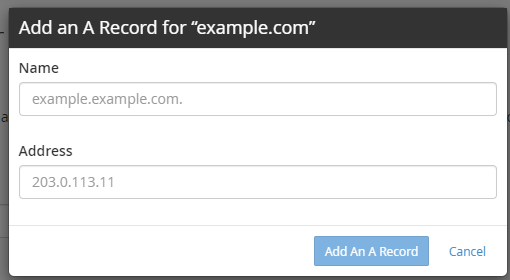
A Record
The A (address) record connects the domain to an IP address. This is one of the primary records used in DNS servers, and one of its functions is to tell us where a website is hosted.
What does it look like?
Where do I find my domain's IP address?
Depending on your host, you can find the IP address assigned to your domain in a control panel. For HostGator, you can find it within your Customer Portal and cPanel. For more information, please check out the article, What is My Server Address?
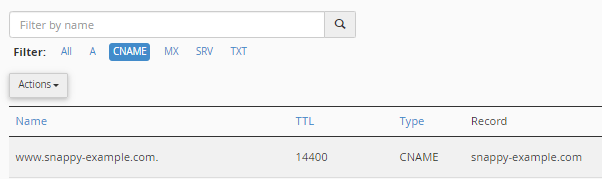
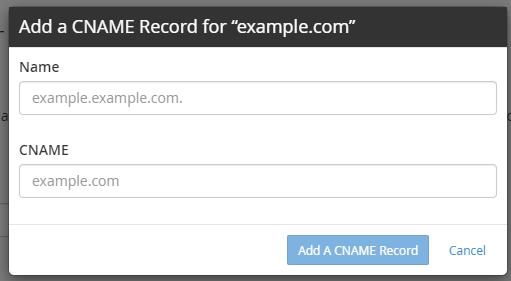
CNAME Record
The CNAME (canonical name) records are used to alias a domain or subdomain to another. It points subdomains to another domain name like www and mail and never directly to an IP address.
What does it look like?
MX Records
The MX (mail exchange) records control where emails are received. They basically tell your server where to deliver your emails. Depending on your email host, MX records vary. Some may have multiple MX records, like Google Workspace, and some may only have one, like HostGator.
Setting up your emails requires the following:
- MX record - Your preferred email host will provide this (usually referred to as the "destination").
- Mail's A record - This is the IP Address pointing to your preferred email host.
- Email routing - This is your email delivery method.
What does it look like?
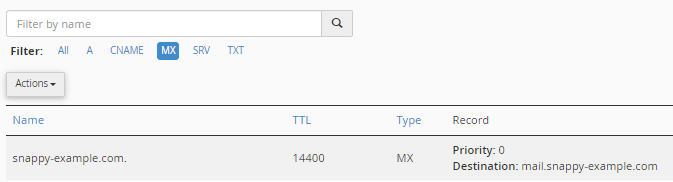
For more information about MX records, you can visit the article, How to Set Up Your MX (Mail Exchange) Record.
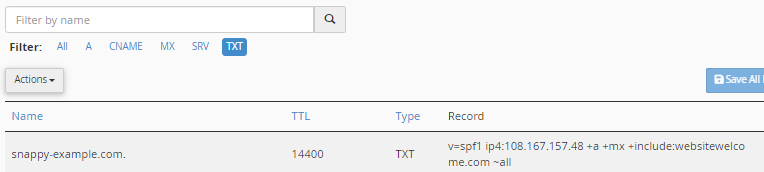
TXT records
The TXT records are custom records that contain machine-readable data. TXT records must be formatted according to whichever technology you use. One of its purposes is validating ownership. A provider may require you to add a TXT record in your control panel to prove ownership of your domain.
What does it look like?
How to update DNS records
- Log in to cPanel.
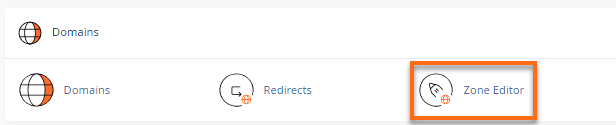
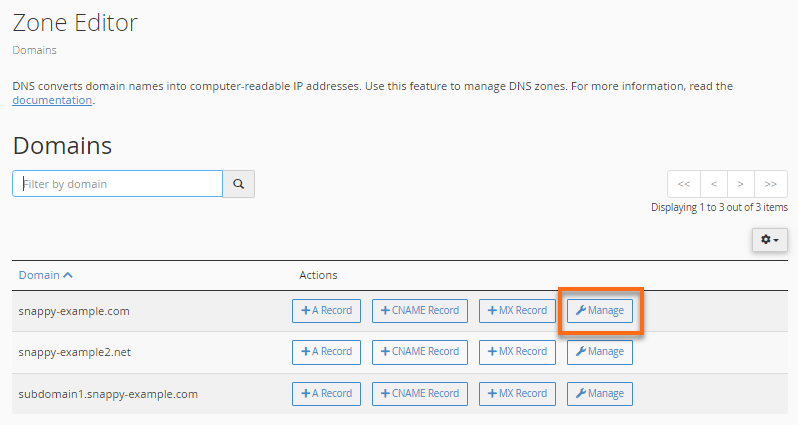
- Look for the Domains section, then click Zone Editor.
- On the next page, locate the domain name you need to edit.
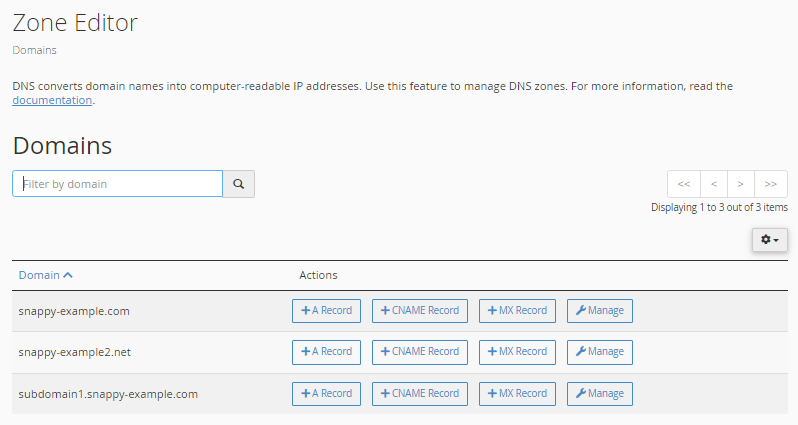
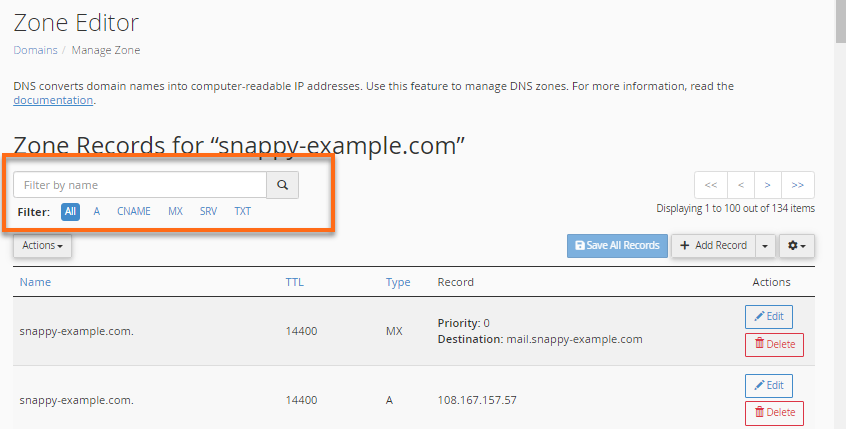
- Click Manage to view the domain's complete set of DNS records.
- Locate the DNS record you wish to update.
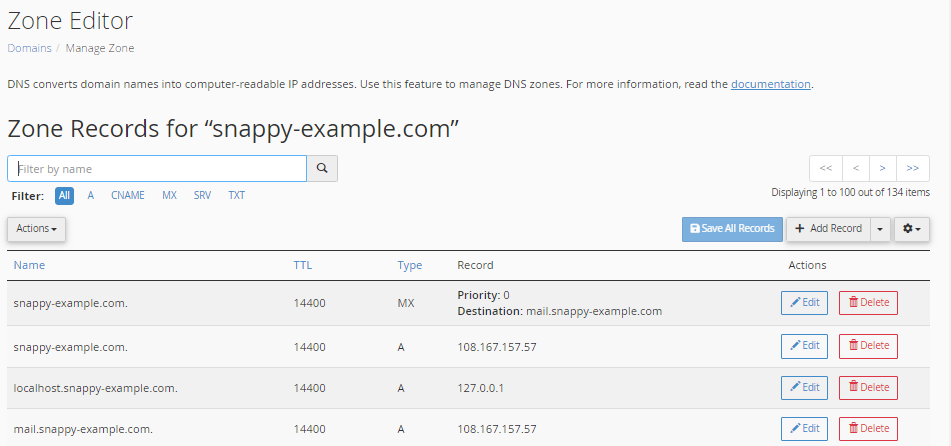
- Make the necessary updates.
- Select Edit to update the DNS record, then click Save Record.
- Click on the Delete button to remove a DNS record. A confirmation popup will appear. Click Continue.
How to add DNS records
There are two ways to add a new DNS record to your cPanel.
Option 1
This method only applies to A, CNAME, and MX records.
- Click the appropriate + button in the Zone Editor section.
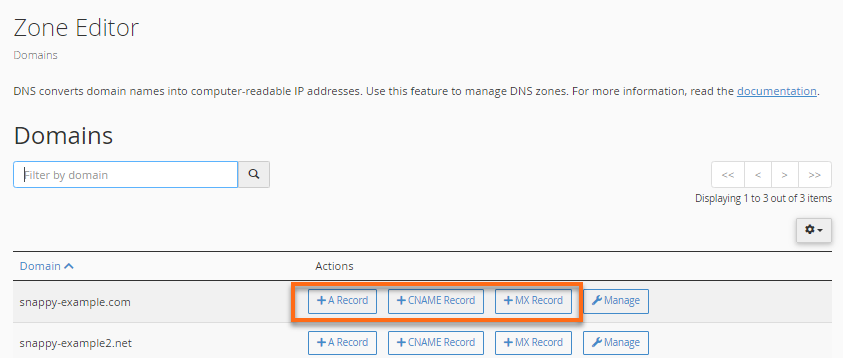
- Enter the necessary details.
A Record
CNAME Record
MX Record
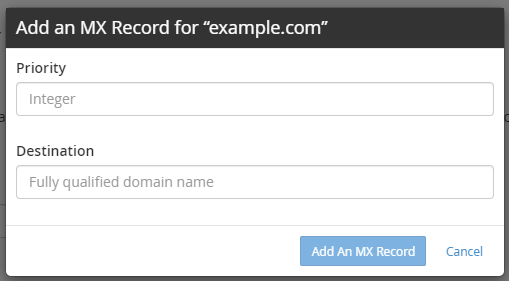
- Click on the Add button.
Option 2
For this method, aside from the A, CNAME, and MX, you can also add an AAAA, SRV, and TXT record.
- Locate your domain in the Zone Editor section, then click its Manage button.
- Click the +Add Record button located on the right side.
- Select the DNS type from the dropdown, then enter the necessary details to complete.
- Click Add Record under the Actions column.
Creating A Subdomain in cPanel
Note: Some subdomain names are reserved: mail, www, FTP, cPanel, WHM, webmail, and web disk. You can use any name except these. We recommend new.mydomain.com or something similar.
Here is a list of terminologies used in this article.
- Domain name - A domain identifies your website in the world-wide-web.
- Subdomain name (or simply subdomain) - A subdomain is a prefix added to the main domain to easily organize and navigate the website. For example, your website is "mydomain.com," while your shop (or subdomain) could be "shop.mydomain.com."
- Document root - This is also known as web server document root. It is a folder where the website files are kept on the server. Each domain name has its unique folder on the server.
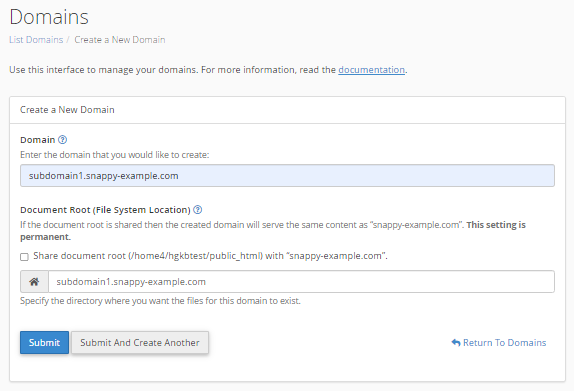
To create a subdomain:
- Log in to cPanel.
- Locate the Domains section, then click the Subdomains icon.
- In the Subdomain field, enter your preferred subdomain name.
For the sample image above, we used "blog" as the subdomain for the main domain, "example.com."
- In the Domain dropdown, select the domain where you wish to associate the subdomain.
- The Document Root field is automatically populated once you enter your subdomain name. You can edit or change the document root file path if you want.
- Hit the Create button.
- Your new subdomain will be displayed on the same page. You can click the Document Root link to go to the subdomain's folder or directory within the File Manager.
To delete a subdomain:
- In the Subdomains section, locate the subdomain you wish to delete.
- Under the Actions column, click Remove.

- Click on the Delete Subdomain button to confirm the deletion.
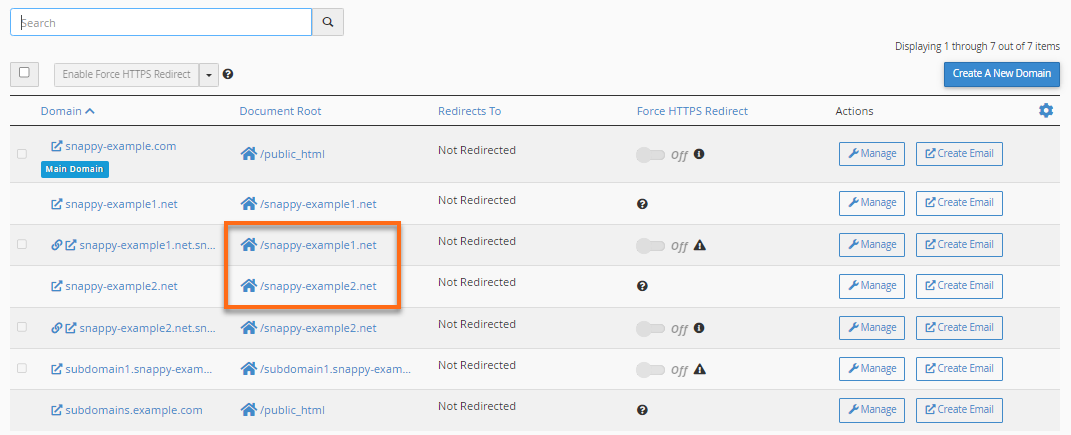
Document root directories for subdomains
If you have addon domains or parked domains in which you want to have the same subdomain name with different content, pay close attention to the Document Root field when creating a subdomain.
When creating subdomains in cPanel, the Document Root field auto-populates with a new folder or directory name. This directory will "house" the contents of your subdomain. Remember that a subdomain is an addon to your main domain, a "sub-portion," so to speak. It operates under the same main domain but gets to have its own identity because of the contents inside its own document root.
Why document root directories cannot be the same
This is very important because if you create "blog.snappygator.com" and "blog.example.com" on the same cPanel and leave the Document Root fields as what the cPanel suggested, both of your blogs (subdomains) will load from the same directory of /public_html/blog. You will not have separate content for each subdomain.
As shown in the image above, when you access the websites blog.snappygator.com and blog.example.com, both will show the same content as they both have the same document root directories.
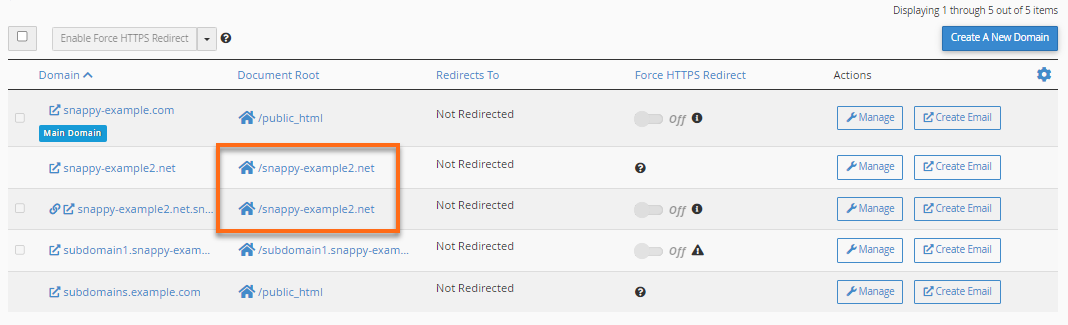
If you own several domains and wish to have a different blog set up for each domain that loads from the subdomain name "blog," you will have to change each domain's document root.
How to avoid duplicate document root directories
To avoid having duplicate document root directories when you create your new subdomain, make sure you set the document root to something other than /public_html/blog. Instead, set it to something like /public_html/blog1. If you have done this correctly, you will have more than one domain using "blog" as a subdomain, but both subdomains will be loading separate content.
The image above shows that blog.snappygator.com and blog.example.com have their own document root directories, thus, making them display their own separate website contents.